So, you’ve finally got your hands on the Starlink Gen 3 kit. That box sitting in your hands isn’t just a collection of electronics; it’s your ticket to high-speed internet, potentially freeing you from the shackles of sluggish DSL or patchy cellular connections. Getting it up and running isn’t rocket science, but a clear roadmap makes all the difference. This guide will walk you through everything you need to know, from unboxing to streaming, ensuring you're online with minimal fuss. Think of it as your personal co-pilot for connecting to the cosmos.
At a Glance: Your Starlink Gen 3 Setup Essentials
- Unboxing: Identify Dishy, the Gen 3 Router, power cable, and the single integrated Dishy cable.
- Location, Location, Location: Find a spot with an unobstructed view of the sky, ideally south-facing in the Northern Hemisphere (or north-facing in the Southern Hemisphere).
- Simple Assembly: Gen 3 Dishy boasts a built-in kickstand for quick ground setup.
- Connect: Plug the Dishy cable into the router, then the router into power.
- App-Driven Setup: Download the Starlink app for guided setup, alignment checks, and network configuration.
- Power Up & Play: Once configured, your Gen 3 system will automatically connect and update.
Why Gen 3? Unpacking What's New and Improved
The Starlink Gen 3, officially known as the Standard Actuated, represents a significant evolution from its predecessors. If you’re upgrading or are simply new to Starlink, you’ll appreciate the refined design and enhanced functionality. Gone are the days of a separate Ethernet adapter for most users; the Gen 3 router now comes equipped with three Ethernet ports as standard, along with Wi-Fi 6 for faster, more efficient wireless connectivity. The dish itself is sleeker, lighter, and features a built-in kickstand, making temporary setups or testing locations a breeze.
This generation also aims for improved power efficiency and potentially better performance in challenging weather conditions, though the core "clear view of the sky" requirement remains paramount. For those keen to dive deeper into the latest iteration, you can always explore Starlink's third generation in more detail.
Pre-Installation Checklist: Gather Your Gear Before You Begin
Before you even think about plugging anything in, a little preparation goes a long way. This ensures a smooth, frustration-free installation process.
1. Unboxing Your Starlink Gen 3 Kit
Carefully open your Starlink box and identify all the components. You should find:
- Starlink Dish (Dishy): The rectangular antenna, now with a built-in kickstand.
- Starlink Gen 3 Router: Your Wi-Fi 6 powerhouse with integrated Ethernet ports.
- Starlink Cable: A single, integrated cable that connects Dishy to the router. This cable carries both data and power.
- Power Cable: For connecting the router to a standard electrical outlet.
- Quick Start Guide: A brief visual aid.
Take a moment to familiarize yourself with each piece. Notice the robust construction and the thoughtful design, especially the kickstand on Dishy.
2. The Critical Site Survey: Finding Your Clear View of the Sky
This is arguably the most crucial step. Starlink needs a clear, unobstructed view of the sky to communicate with the satellites orbiting above. Any physical barrier – trees, buildings, even dense foliage – can cause "obstructions" that lead to intermittent service or slower speeds.
How to Survey Your Site:
- Download the Starlink App: If you haven't already, download the official Starlink app from your device's app store (iOS or Android).
- Use the "Check for Obstructions" Tool: The app has an augmented reality (AR) tool that lets you scan your proposed installation site. Hold your phone up and slowly pan the camera across the sky. The app will highlight any potential obstructions in red.
- Aim for the Ideal: Look for a spot that gives you a completely clear, unobstructed view in all directions for at least a 100-degree cone (imagine looking straight up and then out about 50 degrees from vertical in every direction). In the Northern Hemisphere, Starlink dishes generally point northward, so ensuring a clear view in that direction is especially important.
- Think Long-Term: Consider seasonal changes. Those leafless trees in winter might suddenly become dense obstructions in summer. Also, think about future construction or tree growth.
Don't rush this step. A well-chosen location will save you headaches down the line.
3. Power Requirements & Cable Length
- Power Outlet: You’ll need a standard 120V AC (US) power outlet for the Starlink router.
- Cable Length: The integrated Starlink cable is typically long enough for most ground-level or single-story roof installations. If you anticipate needing a much longer run, professional assistance or planning for an extended cable might be necessary (though extending the primary Dishy cable isn't trivial and often requires specific Starlink-approved extensions or techniques).
4. Minimal Tools Required
For a basic kickstand setup, you essentially need no tools. However, if you plan for a permanent mount, you'll need:
- Drill (for roof mounts)
- Screwdriver
- Stud finder (for mounting brackets)
- Ladder (safely)
- Personal protective equipment (PPE) like gloves and safety glasses.
Step-by-Step Installation: Getting Your Gen 3 Online
With your site surveyed and components laid out, it's time to bring your Starlink to life. The Gen 3 makes this process incredibly user-friendly.
1. Initial Assembly & Positioning Dishy
- Unfold the Kickstand: The Gen 3 dish has a built-in kickstand. Simply unfold it until it clicks into place, providing a stable base for the dish.
- Place Dishy: Position Dishy on the ground or a stable elevated surface in your chosen clear-sky location. The dish doesn't need to be perfectly level or facing a specific direction initially; its internal mechanisms will handle fine-tuning once powered on.
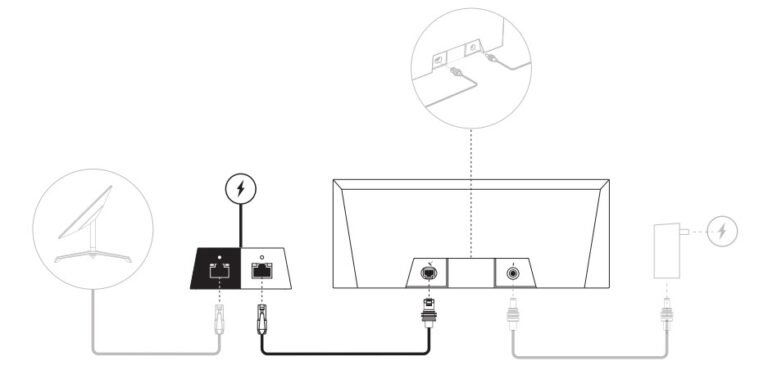
2. Connecting the Cable: Dishy to Router
The Gen 3 system simplifies cabling significantly.
- Connect to Dishy: The integrated cable is permanently attached to the dish.
- Connect to Router: Take the other end of this cable and firmly plug it into the dedicated port on the Starlink Gen 3 Router. It's a single, robust connection point, designed to be foolproof. You'll hear a satisfying click when it's properly seated.
3. Powering Up Your System
- Router Power: Plug the power cable into the Starlink Gen 3 Router, and then plug the other end into a standard electrical outlet.
- Observe Dishy: Once powered, Dishy will typically begin a self-test and alignment routine. It may move slowly, orienting itself to find the optimal angle for satellite communication. This can take several minutes. Be patient and avoid touching it during this process.
4. The Starlink App: Your Control Center
Your smartphone is key to completing the setup.
- Open the Starlink App: Launch the app you downloaded earlier.
- Initial Setup: The app should detect your new Starlink system. Follow the on-screen prompts.
- Create Your Network: You’ll be guided to:
- Name your Wi-Fi network (SSID): Choose something memorable.
- Set a password: Create a strong, unique password for your network.
- Wait for Connection: The app will display the status of your Starlink connection. It might show "Searching," "Connecting," or "Online." This process often includes a firmware update for the dish and router, which can take 10-20 minutes. Don't worry if it seems to pause or reboot during this time.
- Confirm Alignment: The app will confirm the dish's alignment and report on any detected obstructions. If obstructions are reported, you may need to reposition Dishy.
- Test Speeds: Once "Online," use the app's built-in speed test to verify your connection performance.
Congratulations! Your Starlink Gen 3 system is now installed and online. You can now connect your devices (phones, laptops, smart TVs) to your new Starlink Wi-Fi network using the SSID and password you created.
Mounting Options Beyond the Kickstand
While the Gen 3’s kickstand is great for temporary setups, many users will want a more permanent, secure, and optimally placed mount. Starlink offers a variety of official mounting accessories, and third-party options are also available.
1. Permanent Roof Mounts
- Pole Mount: This popular option involves attaching a sturdy pole to your roof, often using specialized brackets. Dishy slides onto the pole, elevating it above potential obstructions like gutters or short fences.
- Pivot Mount: Designed for angled roofs, the pivot mount allows Dishy to be mounted securely while maintaining its ability to self-align.
- Ridgeline Mount: Ideal for mounting Dishy directly on the peak of a roof, offering maximum elevation and often the best view of the sky.
2. Other Specialized Mounts
- Ground Pole Mount: If a roof mount isn't feasible or desired, a ground pole mount allows you to install a tall pole firmly in the ground, providing similar elevation.
- Wall Mount: For mounting Dishy to the side of a building, ensuring a clear view.
Safety Considerations for Roof Mounting
- Secure Footing: Always use a sturdy ladder and ensure it's securely placed.
- Fall Protection: If working on a steep roof, consider a fall arrest system.
- Roof Integrity: Ensure any drilling or mounting doesn't compromise your roof's waterproofing. Use appropriate sealants and techniques.
- Cable Management: Plan your cable run carefully, securing it to prevent damage from wind or animals. Avoid sharp bends.
- Professional Help: If you're uncomfortable working on a roof or dealing with electrical cabling, consider hiring a professional installer.
Troubleshooting Common Issues
Even with the best planning, sometimes things don't go perfectly. Here’s how to tackle common Starlink Gen 3 issues.
"Offline" Status or No Internet
- Check Obstructions: Re-run the obstruction check in the Starlink app. Even a small new obstruction (like a growing tree branch or a new structure) can disrupt service.
- Cable Connection: Ensure the cable between Dishy and the router is firmly seated at both ends. Unplug and re-plug to ensure a good connection.
- Power: Verify the router is plugged in and receiving power. Check the outlet.
- Starlink Outage: Occasionally, Starlink itself might experience service interruptions. Check the Starlink app for any reported outages in your area.
- Hard Reset: Unplug the router from power for 20 seconds, then plug it back in. Repeat this process three times in quick succession (within 2-3 seconds of each other) to perform a factory reset. You'll then need to reconfigure your Wi-Fi network via the app.
Slow Speeds or Intermittent Connection
- Obstructions: This is the most common culprit. Relocate Dishy if necessary.
- Router Placement: The Gen 3 router has Wi-Fi 6, but physical barriers (thick walls, metal objects) can still degrade Wi-Fi signal. Try moving the router to a more central location or closer to your primary devices.
- Network Congestion: If you have many devices connected, especially bandwidth-heavy ones, your local network might be saturated.
- Wi-Fi Interference: Other Wi-Fi networks or electronics can interfere with your signal. Try changing your Wi-Fi channel in the router settings via the Starlink app (if available).
- Dishy Health: Check the "Debug Data" section in the app for any errors or warnings related to Dishy's health.
App Issues or Router Not Responding
- Restart App: Close and reopen the Starlink app.
- Restart Phone: Sometimes a device reboot can clear software glitches.
- Router Reboot: Unplug the Starlink router for a minute, then plug it back in.
- Factory Reset: As mentioned above, a hard reset (unplugging 3 times quickly) can resolve stubborn router issues, but you'll lose your Wi-Fi settings.
Optimizing Your Starlink Experience
Getting online is just the first step. Here’s how to ensure you're getting the best performance from your Starlink Gen 3.
1. Optimal Router Placement
Even with a powerful Wi-Fi 6 router, placement matters.
- Central Location: Place the router in a central location within your home, ideally high up, to maximize signal coverage.
- Avoid Obstructions: Keep it away from large metal objects, thick concrete walls, and other electronics that can cause interference.
- Line of Sight: For best performance, aim for a clear line of sight between the router and your most-used devices.
2. Consider a Mesh Wi-Fi System
If you have a large home or multiple floors, the single Starlink Gen 3 router might not cover everything effectively.
- Starlink Mesh Nodes: Starlink offers its own mesh Wi-Fi nodes that integrate seamlessly with the Gen 3 router.
- Third-Party Mesh Systems: Thanks to the integrated Ethernet ports, you can easily connect a third-party mesh Wi-Fi system (like Eero, Google Nest Wifi, or TP-Link Deco) to your Starlink router. Connect the main mesh node to one of the Gen 3 router's Ethernet ports and configure it in "Access Point" mode if you want to retain the Starlink router's Wi-Fi, or in "Router Mode" if you want to disable the Starlink Wi-Fi and use your mesh system as the primary router.
3. Monitor Performance Regularly
The Starlink app provides valuable insights into your system's performance.
- Statistics Tab: Check the "Statistics" tab for latency, download/upload speeds, and any reported outages or network issues.
- Obstruction Map: Periodically re-check the obstruction map, especially after heavy winds or changes in foliage.
4. Keep Firmware Updated
Starlink regularly pushes firmware updates to both Dishy and the router. These updates improve performance, add features, and fix bugs. Your system will typically update automatically during low-usage periods, but it’s good to be aware that a brief outage might occur during an update. Ensure your system remains powered on to receive these critical updates.
Frequently Asked Questions (FAQs)
Can I use my own router with Starlink Gen 3?
Yes, absolutely! The Gen 3 router comes with three Ethernet ports. You can connect your preferred third-party router or mesh system to one of these ports. For optimal performance, you might want to disable the Wi-Fi on the Starlink router once your external router is configured.
How does Starlink Gen 3 handle severe weather?
Starlink dishes are designed to withstand various weather conditions, including rain, hail, and snow. They have a heating element to melt snow and ice. However, extremely heavy rain (attenuation), blizzards, or severe thunderstorms can temporarily degrade service or cause brief outages. Service usually recovers quickly once the severe weather passes.
How long does the Starlink Gen 3 setup typically take?
For a basic kickstand setup, most users can be online within 10-30 minutes after unboxing. This includes powering up, Dishy finding satellites, and the app-guided network setup. Permanent mounting naturally adds more time.
Is professional installation recommended for Starlink Gen 3?
For basic ground-level setups, professional installation isn't usually necessary. However, if you're uncomfortable with heights, drilling into your roof, running long cables, or need a complex network setup, hiring a qualified professional is a wise investment to ensure safety and optimal performance.
What is the power consumption of Starlink Gen 3?
While specific figures can vary, the Gen 3 system is generally more power-efficient than previous generations. Dishy's power consumption varies depending on factors like ambient temperature (due to the heater) and satellite tracking activity, typically ranging from 75-100 watts on average. The router consumes minimal power.
Beyond Setup: Making the Most of Your Connection
Your Starlink Gen 3 isn't just a gadget; it's an investment in reliable, high-speed internet. Now that you're online, take full advantage of it. Explore online gaming with low latency, stream 4K content without buffering, or finally conduct those video calls without annoying freezes. The integrated Ethernet ports mean you can easily hardwire devices for maximum stability, or connect network-attached storage (NAS) devices for a robust home network.
Remember, Starlink is a continually evolving service. Stay informed through the Starlink app and support resources. With a little care and understanding, your Gen 3 system will provide you with a gateway to the digital world that truly feels limitless. Enjoy the speeds, and welcome to the future of connectivity!