The moment you unbox your Starlink Generation 3 dish, you’re not just holding a piece of hardware; you're gaining entry to a rapidly evolving connectivity landscape. While the Gen 3 dish itself is a marvel of engineering—sleeker, more robust, and packing enhanced Wi-Fi 6 capabilities—its true potential unfolds within its expanding accessory and ecosystem. Gone are the days when Starlink was a standalone marvel; today, it’s a foundational component ready to integrate into your life, whether at home, on the road, or off-grid. This guide will walk you through the essential first-party offerings, dive deep into the versatile world of third-party solutions, and help you build a reliable, high-performing satellite internet setup tailored precisely to your needs.
At a Glance: Key Takeaways for Your Gen 3 Setup
- Gen 3 is Different: The new rectangular dish brings a fresh form factor and internal Wi-Fi 6 router, impacting accessory compatibility and installation.
- Ethernet is Optional, but Essential for Many: Unlike previous generations, Gen 3 requires a separate Ethernet Adapter for wired connections, crucial for power users and integrating into existing networks.
- Mounting Variety: Official mounts cater to various needs (roof, pole, flat surface), but the third-party market offers innovative, specialized solutions.
- Networking Beyond the Basics: Starlink Mesh Nodes extend Wi-Fi, but understanding bypass mode and third-party routers can unlock advanced network control.
- Power & Portability are Key: Accessories for mobile use (RVs, vans, boats) and off-grid power solutions are critical considerations for diverse users.
- Third-Party Savvy: While official accessories offer guaranteed compatibility, the third-party ecosystem provides cost-effective, specialized, or custom solutions—but choose wisely.
- Ecosystem Integration: Think beyond just internet access; consider how Starlink fits into your broader smart home, mobile office, or remote living setup.
The Heart of Gen 3: Understanding Your New Connectivity Hub
Starlink Generation 3 represents a significant leap forward in design and performance. Its compact, sleeker form factor and integrated Wi-Fi 6 router simplify initial setup for many, particularly those using it as a standalone Wi-Fi solution. However, this redesign also means that some accessories from older Starlink generations might not be directly compatible. The shift necessitates a fresh look at how you connect, mount, and power your dish, pushing Starlink from a simple internet provider to a more complete, adaptable connectivity ecosystem. For a deeper dive into the dish itself, you might find our guide on Understanding Starlink Generation 3 particularly insightful.
Why Accessories Matter More Than Ever for Gen 3
With Gen 3, the accessories aren't just add-ons; they're often integral to maximizing your experience. The native Wi-Fi 6 router is excellent, but if you need wired connections, an Ethernet adapter is non-negotiable. If you're using Starlink on the move, specialized mounts and power solutions transform it from a fixed installation into a flexible, portable powerhouse. Understanding this accessory landscape is key to unlocking the full potential of your high-speed satellite internet.
Official Essentials: What Comes Straight from SpaceX?
SpaceX, through Starlink, offers a core set of first-party accessories designed for seamless compatibility and optimal performance with your Gen 3 dish. These are often the safest and most straightforward options, especially when you're just getting started.
1. The Ethernet Adapter: Bridging Wired and Wireless Worlds
The Gen 3 dish integrates its router directly, offering Wi-Fi 6 connectivity. However, if you need to hardwire devices (like a gaming console, desktop PC, or network-attached storage) or integrate Starlink into an existing home network, the Ethernet Adapter is an absolute must-have.
- Function: This small adapter plugs into the Gen 3 dish's proprietary port and provides a standard RJ45 Ethernet port.
- Why You Need It:
- Reliable Wired Connections: For devices demanding consistent, low-latency connections where Wi-Fi can be prone to interference.
- Network Integration: Allows you to connect Starlink to a third-party router, switch, or mesh system, expanding your network's capabilities beyond Starlink's native Wi-Fi.
- Bypass Mode: Essential for using your own router, allowing Starlink's built-in Wi-Fi to be disabled, preventing double NAT issues and giving you full control over your network.
2. Official Mounting Solutions: Secure Your Signal
Starlink's official mounts are engineered for precision and durability, ensuring your dish has a clear view of the sky and remains stable in various conditions. Gen 3 mounts are typically designed to securely attach the dish's built-in kickstand or integrate directly with its new form factor.
Types of Official Mounts for Gen 3:
- Starlink Pivot Mount: Often included or highly recommended. This allows for roof or wall mounting, offering adjustability to find the optimal angle for satellite acquisition. It's designed to be sturdy and discreet.
- Starlink Short Wall Mount / Long Wall Mount: These extend the dish away from a building's eaves or other obstructions, ensuring an unobstructed field of view. Length options provide flexibility depending on your installation site.
- Starlink Pole Mount / Mast Mount: Ideal for attaching to existing poles (like TV antenna masts) or creating a new elevated setup. These are robust and help clear obstacles.
- Starlink Ground Mount: A simple, low-profile solution for placing the dish directly on the ground or a flat surface. Useful for temporary setups or if permanent mounting isn't feasible.
- Starlink Flashing Mount: Designed for watertight installation on sloped roofs, integrating with roof flashing to prevent leaks. This is for professional or experienced DIY installers.
Decision Criteria for Official Mounts:
Consider your dwelling type, local weather conditions (wind, snow), ease of access for installation, and the need for a clear line of sight. Always prioritize safety and ensure the mount is installed securely.
3. Starlink Mesh Wi-Fi Nodes: Extending Your Wireless Reach
While the Gen 3 dish has an integrated Wi-Fi 6 router, larger homes or spaces with challenging layouts might experience dead zones. Starlink's official Mesh Wi-Fi Nodes work seamlessly with the Gen 3 system to extend your Wi-Fi coverage.
- Function: These additional Wi-Fi units connect wirelessly to your main Starlink dish's router, creating a unified mesh network that blankets your area with a strong, consistent signal.
- Benefits:
- Seamless Roaming: Devices automatically connect to the strongest signal as you move around.
- Easy Setup: Managed directly through the Starlink app, simplifying configuration.
- Guaranteed Compatibility: Designed to integrate perfectly with your Gen 3 system.
4. Cabling: The Lifeline of Your Connection
The Gen 3 dish typically comes with a standard length cable. However, depending on your installation location and desired setup, you might need longer runs.
- Official Longer Cables: Starlink offers extended cable lengths to accommodate installations further from your power source or indoor router. These are built to the same specifications as the included cable, ensuring reliability.
- Cable Routing Kits: Official kits might include tools and accessories for neatly and safely routing your Starlink cable through walls or around obstacles, maintaining weather integrity.
Expanding Your Horizon: Key Starlink Gen 3 Accessories & Their Benefits
Beyond the official lineup, a vibrant ecosystem of third-party accessories and general networking gear can significantly enhance your Starlink Gen 3 experience. These solutions often fill specific niches, offer greater customization, or provide cost-effective alternatives.
1. Mounting Solutions: Stability Meets Versatility
While official mounts cover many scenarios, third-party options push the boundaries, offering specialized solutions for unique needs.
Specialized Third-Party Mounts:
- Non-Penetrating Roof Mounts: For those who cannot or prefer not to drill into their roof. These mounts use ballast (e.g., concrete blocks) to secure the dish. Great for renters or temporary structures.
- RV & Portable Tripod Mounts: Designed for quick deployment and portability. These are invaluable for Starlink Roam users, allowing rapid setup at campsites or remote locations. Look for robust, easy-to-assemble designs.
- Custom Pole Adapters: If you have a unique pole or mast you wish to utilize, third-party adapters can bridge the compatibility gap between Starlink's mounting post and your existing structure.
- Flat Mounts for Vehicles/Boats (DIY/Aftermarket): Though Starlink offers its own Flat High Performance mount for mobility, some users opt for custom, lower-profile, often more discreet installations on RV roofs, vans, or marine vessels, sometimes requiring custom fabrication or third-party solutions.
- Weatherproof Enclosures/Covers: While the Gen 3 dish is rugged, some users seek additional protection from extreme weather, bird nesting, or vandalism, though caution is advised not to impede signal or heat dissipation.
Pro Tip for Mounting: Always check for obstructions using the Starlink app's "Check for Obstructions" tool before finalizing any mount placement. A clear 100-degree cone of vision is critical for uninterrupted service.
2. Networking Nirvana: Extending Your Reach & Reliability
Integrating Starlink Gen 3 into a robust home or mobile network requires more than just the Ethernet Adapter. Thoughtful planning can transform your internet connection into a powerful digital backbone.
Advanced Networking Accessories:
- High-Performance Third-Party Routers: By connecting the Gen 3 Ethernet Adapter to a high-end third-party router, you gain granular control over your network.
- Features: Advanced QoS (Quality of Service), robust parental controls, VPN client/server capabilities, better Wi-Fi coverage, and more wired Ethernet ports.
- Setup: Enable "Bypass Mode" in the Starlink app to essentially turn off the Gen 3's internal router, letting your preferred router handle all network functions.
- Mesh Wi-Fi Systems (Non-Starlink): While Starlink offers its own mesh nodes, dedicated mesh systems from brands like Eero, Orbi, or Ubiquiti can offer superior performance, more features, and expandability, especially in very large or multi-story homes. Connect the main mesh node to the Starlink Ethernet Adapter.
- Managed Switches: For homes or businesses with many wired devices, a Gigabit Ethernet switch expands the number of available LAN ports. A managed switch offers advanced features like VLANs (Virtual Local Area Networks) for network segmentation.
- Long-Range Wi-Fi Extenders/Access Points: In some cases, a traditional Wi-Fi extender or a dedicated access point (AP) wired back to your main router can fill specific coverage gaps without implementing a full mesh system.
- Outdoor Rated Ethernet Cable & Connectors: If you need to run an Ethernet cable outdoors from your Starlink dish (via the adapter) to an indoor router, use outdoor-rated, UV-resistant Cat6 or Cat7 cable and weatherproof connectors to prevent degradation and signal loss.
Understanding Bypass Mode: This critical feature, accessed via the Starlink app, disables the internal Wi-Fi and routing functions of your Starlink Gen 3 dish, allowing a third-party router to take full control. It prevents "double NAT," which can cause issues with online gaming, VPNs, and certain applications.
3. Powering Your Adventures: On the Go and Off-Grid
For Starlink Roam or Maritime users, stable and efficient power solutions are paramount. The Gen 3 dish's power requirements (around 75-100W typical, with peaks) need to be considered.
Portable Power & DC Solutions:
- Portable Power Stations (Battery Banks): High-capacity portable power stations (e.g., from Jackery, Goal Zero, EcoFlow) are essential for off-grid Starlink use. Ensure the power station has a pure sine wave inverter capable of handling the dish's wattage. Look for models with at least a 500Wh capacity for a few hours of operation, or 1000Wh+ for extended use.
- 12V/24V DC Converters (Third-Party): For RVs, vans, and boats, directly powering Starlink from the vehicle's DC system is often more efficient than going DC -> AC inverter -> Starlink's AC adapter -> DC for the dish. Third-party solutions are emerging that convert 12V or 24V DC to the proprietary voltage required by the Starlink dish, bypassing the standard AC brick. This minimizes power loss and extends battery life.
- Caution: These often involve custom wiring and require a solid understanding of electrical systems. Improper use can damage your Starlink. Always research reputable manufacturers and solutions.
- Surge Protectors & UPS (Uninterruptible Power Supplies): Especially in areas with unstable power or frequent lightning, a good surge protector is vital for any connected equipment. A UPS can provide temporary power during outages, allowing for graceful shutdowns or brief continued operation.
Energy Efficiency Tip: In a mobile setup, consider solutions that bypass the Starlink AC power adapter. The less conversion (DC to AC to DC), the less energy is wasted as heat, prolonging your battery life.
4. Protection & Portability: Keeping Your Investment Safe
Protecting your Starlink Gen 3 dish and making it easier to transport are key considerations for many users.
Safeguarding Your Starlink:
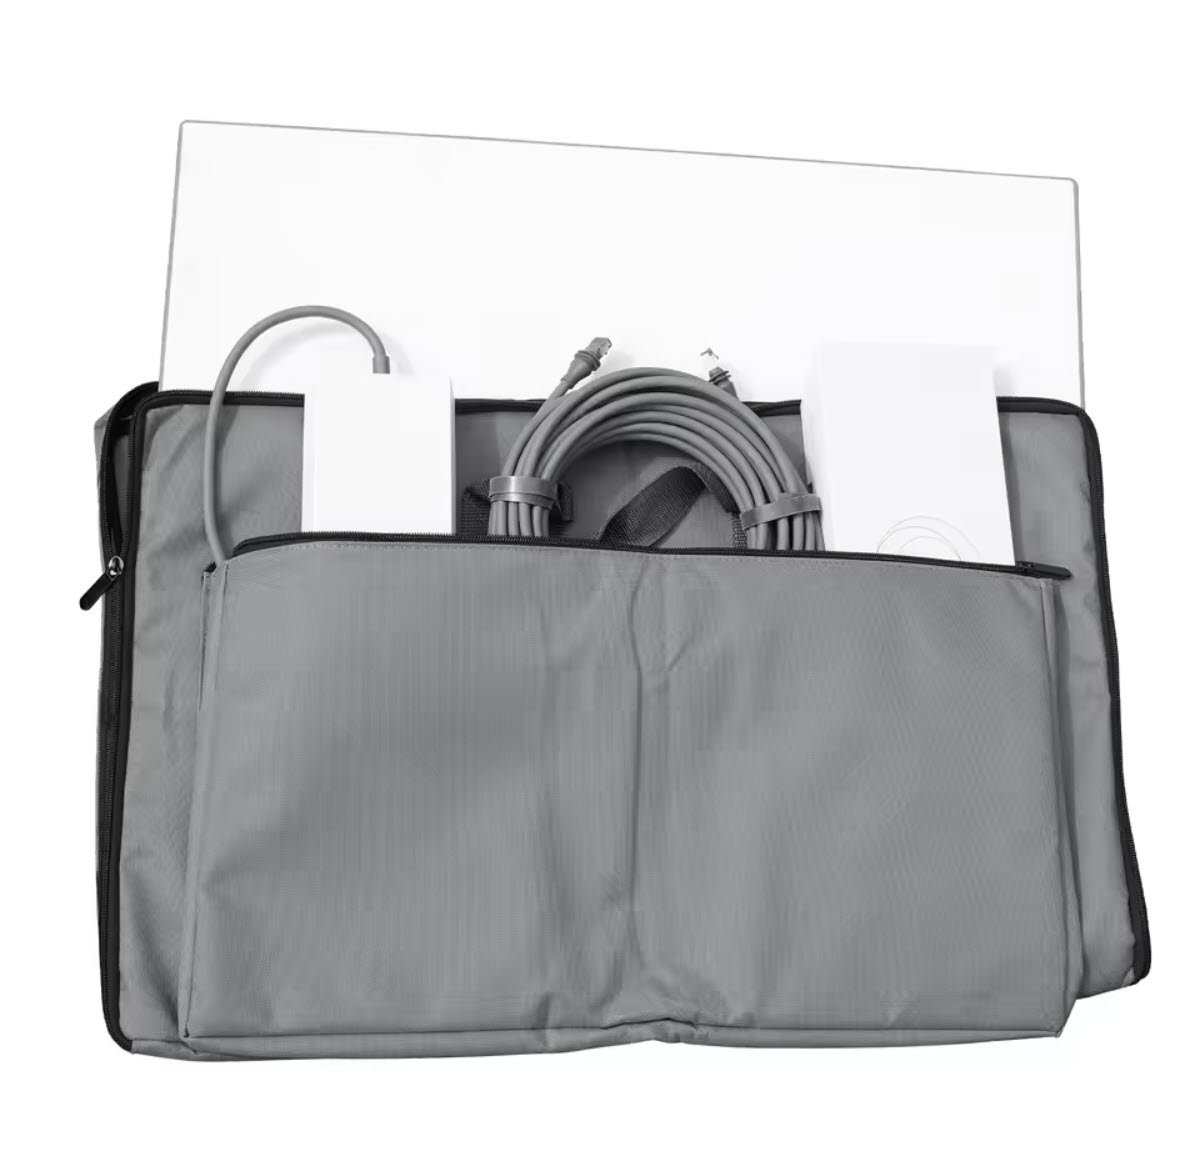
- Hard-Shell Carrying Cases: For Roam users, a rugged, custom-fit hard case (like those from Pelican or specialized Starlink case manufacturers) is invaluable. These protect the dish, cables, and router during transport, shielding them from impacts, dust, and water.
- Security Brackets & Locks: If your Starlink is in a publicly accessible area, consider security brackets or anti-theft devices that make it harder to remove the dish without specialized tools.
- Cable Management & Protection: Use UV-resistant cable ties, conduit, or flexible tubing to protect outdoor cables from physical damage, pests, and sun exposure. Ensure drip loops are formed to prevent water ingress into your building.
- Sealants & Weatherproofing: When routing cables through walls or roofs, use high-quality silicone sealants and cable grommets to maintain your building's weather integrity.
Navigating the Third-Party Ecosystem: Smart Choices
The allure of third-party Starlink accessories is strong. They often offer specialized features, unique aesthetics, or more competitive pricing than official Starlink products. However, caution and due diligence are crucial.
When to Consider Third-Party Options:
- Niche Needs: When official accessories don't cover a specific requirement (e.g., a highly specialized RV mount, custom DC power solution).
- Cost-Effectiveness: Third-party alternatives can sometimes be more affordable for items like basic pole mounts or storage cases.
- Innovation & Customization: Independent manufacturers often lead with creative solutions for unique installation challenges or advanced network setups.
- Availability: Sometimes an official accessory is out of stock, and a reliable third-party option can fill the gap.
Quality and Compatibility Considerations:
- Research Thoroughly: Read reviews, check compatibility specifically for Starlink Gen 3, and look for products with good customer support.
- Warranty Implications: Be aware that using non-official accessories, especially those that involve altering the Starlink hardware or its power supply, could potentially void your Starlink warranty. Always confirm with Starlink support if you have concerns.
- Electrical Safety: For power-related accessories (especially DC converters), prioritize safety. Ensure they meet relevant electrical standards and have built-in protections against overcurrent, overvoltage, and short circuits. Cheap, poorly made power accessories can damage your Starlink or pose a fire risk.
- Mechanical Integrity: For mounts, ensure the materials are durable, corrosion-resistant, and capable of withstanding local wind loads and weather conditions.
- Signal Integrity: Be wary of anything that claims to "boost" the Starlink signal directly. The dish is highly optimized; external components are more likely to degrade than improve performance. Focus on network extenders, not dish boosters.
Setting Up Your Starlink Gen 3 Ecosystem: A Strategic Approach
Building an effective Starlink Gen 3 ecosystem isn't just about buying accessories; it's about thoughtful planning and strategic integration.
- Assess Your Needs First:
- Location: Is it fixed (home, office) or mobile (RV, boat)?
- Environment: Urban, rural, extreme weather? Any obstructions (trees, buildings)?
- Users & Devices: How many people will use it? What kind of devices (streaming, gaming, work)?
- Network Requirements: Do you need wired connections? Extensive Wi-Fi coverage? Advanced network control?
- Power: Is a standard AC outlet always available, or do you need DC/off-grid solutions?
- Plan Your Installation:
- Clear Line of Sight: Use the Starlink app to find the optimal dish placement before installing any mounts.
- Cable Routing: Map out how cables will run, minimizing exposure and ensuring weatherproofing.
- Power Access: Ensure power outlets or DC connections are conveniently located and robust enough.
- Prioritize Official for Core Components:
- For the initial mount and the Ethernet Adapter, starting with official Starlink accessories guarantees compatibility and often simplifies troubleshooting.
- Integrate Third-Party Solutions Incrementally:
- Add third-party routers, mesh systems, or specialized mounts once your core Starlink internet connection is stable. This helps in isolating potential issues.
- Test Thoroughly:
- After each major addition or change to your setup, test your internet speed, Wi-Fi coverage, and the functionality of connected devices.
- Monitor performance through the Starlink app for any obstructions or connectivity issues.
Common Questions & Misconceptions About Gen 3 Accessories
Let's clear up some frequent points of confusion regarding Starlink Gen 3 and its accessory ecosystem.
- "Are Gen 2 accessories compatible with Gen 3?"
- Generally, no, not directly. The Gen 3 dish has a different form factor and a new proprietary connector. Gen 2 mounts, cables, and even the Ethernet adapter are not compatible with Gen 3. You'll need Gen 3 specific accessories.
- "Do I need an Ethernet adapter for Gen 3?"
- Not if you're solely using Wi-Fi. The Gen 3 dish has an integrated Wi-Fi 6 router. However, if you want to hardwire any device (PC, gaming console, smart TV, security camera hub, etc.) or connect a third-party router/mesh system, the official Ethernet Adapter is absolutely essential.
- "Can I use any mesh Wi-Fi system with Gen 3?"
- Yes, but you need the Ethernet Adapter. Once you have the Ethernet Adapter, you can connect the main unit of virtually any third-party mesh Wi-Fi system (e.g., Eero, Netgear Orbi, Google Nest Wifi) to it. Remember to enable "Bypass Mode" in the Starlink app to get the best performance from your third-party mesh.
- "Is Gen 3 truly portable out-of-the-box for RVs/Vans?"
- Technically, yes, with a caveat. The Gen 3 dish has a built-in kickstand, making it easier to set up on a flat surface. However, for true portability and optimal performance, you'll likely want a more stable mounting solution (like a tripod mount) and perhaps a portable power station. The kickstand is good for temporary, sheltered use, but not for sustained exposure to wind or accidental bumps.
- "Can I use a longer cable than the one provided with Gen 3?"
- Yes, Starlink offers longer official cables. While the dish comes with a standard length, you can purchase longer cables directly from Starlink to suit your installation needs. Avoid using unofficial cable extensions or splicing, as this can degrade signal quality and compromise weather resistance.
- "Will a third-party Wi-Fi extender boost my Starlink signal?"
- It will extend your Wi-Fi coverage, not your Starlink satellite signal. A Wi-Fi extender connects to your Starlink's Wi-Fi and re-broadcasts it, helping to cover dead zones in your home. It does nothing to improve the signal quality or speed of the actual satellite connection from the dish itself. For best results, consider a Starlink Mesh Node or a robust third-party mesh system connected via the Ethernet Adapter.
Future-Proofing Your Connectivity: What's Next for Starlink's Ecosystem?
The Starlink Gen 3 story is far from over. As SpaceX continues to launch more satellites and refine its technology, we can anticipate further advancements in the accessory ecosystem. Look out for:
- More Integrated Solutions: Potentially more compact or specialized power solutions directly from Starlink.
- Advanced Networking Features: Software updates that might unlock new routing capabilities or IoT integration directly through the Starlink app.
- Robust Third-Party Market: As Gen 3 becomes more widespread, the third-party accessory market will mature, offering even more innovative and specialized solutions for every conceivable use case.
- Improved Mobility Accessories: As services like Starlink Mobile (formerly Roam) grow, expect better, more rugged, and more integrated solutions for vehicles and marine environments.
Making the Most of Your Starlink Gen 3 Investment
Your Starlink Gen 3 is more than just an internet dish; it's the gateway to reliable, high-speed connectivity in places where traditional internet can't reach. By strategically selecting and integrating the right accessories, you can transform your basic internet connection into a robust, flexible, and powerful ecosystem that perfectly matches your lifestyle.
Here's how to maximize your investment:
- Prioritize a Stable Mount: A secure and well-placed mount is the foundation of reliable internet. Don't cut corners here.
- Embrace Wired Connectivity: Even if you prefer Wi-Fi, the Ethernet Adapter unlocks significant flexibility for power users, network integration, and ensures you're prepared for future upgrades.
- Optimize Your Wi-Fi Coverage: Don't let your high-speed internet be hampered by poor indoor Wi-Fi. Whether through Starlink Mesh Nodes or a third-party system, ensure robust coverage throughout your space.
- Think Long-Term and Mobile: If you ever plan to use Starlink away from a fixed location, invest in quality portable power and carrying solutions from the outset.
- Stay Informed: The Starlink ecosystem is dynamic. Keep an eye on official announcements and reputable third-party developments to discover new accessories and optimize your setup.
By understanding the capabilities of your Starlink Gen 3 and leveraging its rich accessory ecosystem, you're not just getting online; you're building a connectivity solution that's as adaptable and resilient as you need it to be.